TL:DR – Ridge installation decides whether a lightweight steel roof performs for forty years or develops problems at the apex within a decade. The ridge is the one junction on any pitched roof where fixing sequence, sealing, and ventilation decisions compound directly into long-term performance. What follows covers the complete installation sequence for Metrotile’s dry-fix ridge system, from batten preparation through to vented cap fixing.
Ridge Detail Installation Secrets for Weatherproof Steel Roofs
The apex of a roof carries more installation risk than any other single detail. Two slopes converge at a point permanently exposed to wind pressure, driven rain, and the thermal cycling that slowly opens every poorly sealed joint.
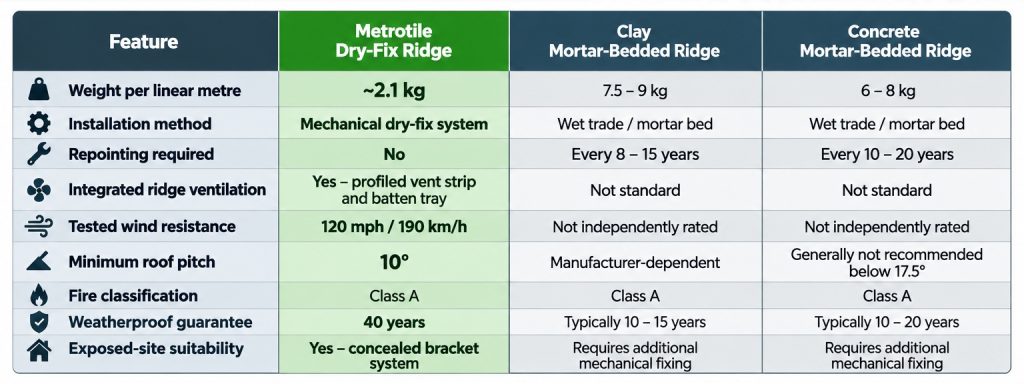
On traditional roofs, clay or concrete ridges are bedded in mortar. That mortar looks solid on day one. In practice, freeze-thaw cycling and the micro-movement of timber roof structures crack the mortar bed within eight to twelve years on any exposed roofline. Once that joint opens, water tracks beneath the cap, migrates down the tile laps, and presents at the ceiling months after the actual failure point.
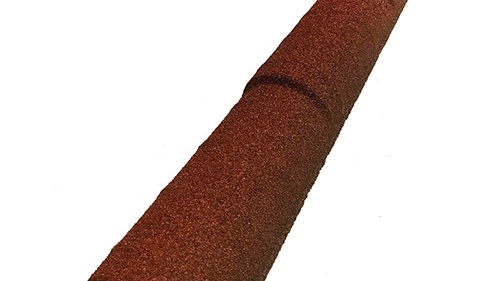
Metrotile’s approach removes mortar entirely. Their roof ridge tiles use a fully mechanical dry-fix method: the cap compresses against continuous butyl sealant tape, fixed through the panel profile into a timber ridge batten using stainless fasteners. The range covers three core options: the Delta Ridge for standard angled profiles, the Angle/Veranda Ridge for single-pitch and veranda roofs, and the Triple Barrel Ridge for curved aesthetic profiles. Each is manufactured from aluminium-zinc compound and colour-matched to the full Metrotile tile range, backed by a 40-year weatherproof guarantee.
Weight matters on any retrofit. A Metrotile ridge cap runs to roughly 2.1 kg per linear metre. A clay hip roll is typically 7.5 to 9 kg. That gap is structural.
On older properties where ridge boards and purlins are already working near their load limit, that difference is significant before a cap goes on. Field panels must be fully laid and all end laps secured before any ridge cap is positioned. Working ridge-first invariably produces compressed laps, lifted flanges at the apex, and future water paths at exactly the points that are hardest to inspect.
Precision Alignment and Sealing Techniques for Ridge Caps
Ridge alignment starts at the midpoint of the ridge run, not at one gable. Beginning at the verge end and progressing linearly accumulates angular error. By the far hip, the offset can reach 25 to 30mm, visible from the street and a direct problem for the weather seal.
Before any cap goes down, run continuous butyl sealant tape along both panel flanges at the apex. Tape positioned after the cap is seated introduces air voids under the compression joint. The surface needs to be clean and dry, which means clearing stone granules from the flange face first. Each cap fixes with two stainless self-tappers on the leading edge before trailing edge screws engage, drawing the cap flat against the butyl uniformly and preventing edge lift.
Overlap between adjacent caps should be a minimum of 50mm. On westerly-exposed sites, increase the upslope overlap to 75mm on the exposed face. Thermal movement in steel ridges is real: a 9-metre ridgeline will move 3 to 4mm across the UK’s annual temperature range. Fix one end solid, allow the opposite end caps to slide under the overlap, and leave a 5mm clearance at the trailing edge screw position to prevent buckling.
Preventing Water Infiltration Along Complex Roof Joints
Hip ridges account for a disproportionate share of ridge-related failures. The geometry is more demanding and the treatment of cut edges after trimming is where installers take shortcuts that cost clients several seasons later.
Every cut end on a Metrotile cap must be dressed immediately with the manufacturer’s steel edge sealant. The hot-dip galvanised layer exposed by cutting begins surface oxidation within two to four seasons on coastal sites or near industrial emissions. Stone granule coverage to the cut face is part of the trim-and-dress operation. Not an optional finish. Bare steel corrodes.
At T-ridge and Y-junction points where two ridgelines intersect, the upper ridge cap must overlap the lower by 100mm minimum and be sealed on all three exposed sides. On L-shaped plan forms or complex hip geometries, a secondary bead of low-modulus silicone over the butyl at these junctions provides additional backup, and it has maintained watertight junctions on several rooflines where the standard detail was working close to its geometric limits.
Fastening Systems and Venting Integration for Ridge Tiles
Standard fasteners are 65 x 4.8mm stainless self-tapping screws, two per cap side, penetrating through the panel and into the ridge batten. Into a 38 x 50mm batten, that provides roughly 32mm of thread engagement in timber. Twenty-five millimetres is the practical minimum; below that, wind uplift progressively loosens fixings on exposed sites over several seasons.
Ventilation is the aspect most consistently under-specified. Approved Document F and BS 5250 require 3,000mm2 of equivalent ventilation area per metre run at ridge level on standard cold-roof pitched applications. A mortar-bedded clay ridge delivers zero. Not close to zero. Zero. A generic foam filler cut to approximate width from a builders’ merchant delivers an unmeasured result.
Metrotile’s vented ridge system uses a profiled foam ventilation layer specifically manufactured to the panel geometry, together with a ridge vent strip and a batten tray that prevents underlay from blocking the airflow gap. The batten tray is the detail most commonly skipped under time pressure. Without it, the underlay sags into the ventilation path and the ridge vent delivers a fraction of its rated equivalent area. Foam fillers are specified at the top tile course where required to maintain watertightness at the profile transition.
Concealed Fixing Methods for Enhanced Storm Resistance
Exposed screw-head fixing is adequate for sheltered inland locations. On exposed sites, anything above 200 metres elevation, coastal positions within 2 kilometres of the shoreline, or projects in Wind Zones 3 or 4 under BS 6399, concealed bracket fixing should be specified from the project’s outset.
The concealed bracket locates within the cap profile and fixes through to the batten below, leaving no screw heads on the upper face. The cap clips over the bracket head. No visible penetrations, no exposed washer sealants, no water path down a screw shank. Those EPDM washers on standard fixings harden and delaminate over fifteen to twenty years. A concealed bracket system has no equivalent wearing component above the tile line, rated to resist wind uplift consistent with Metrotile’s 120 mph test certification.
Concealed fixing also satisfies planning requirements in conservation areas and Article 4 direction zones, where local authority guidance discourages visible fixings on rooflines. Check those conditions at the survey stage.
Ventilation Requirements to Prevent Under Roof Condensation
Interstitial condensation in cold roof spaces has become a consistent problem as building fabric airtightness improves. Warm, moist internal air that previously escaped through gaps in window frames and service penetrations now finds the cold underside of the roof deck.
BS 5250 requires cross-ventilation at two levels: a low-level inlet at or near eaves, and a high-level outlet at or near the ridge. Both are necessary. Neither alone is sufficient.
This is where coordination between separate contractors breaks down.
A recurrent failure pattern: vented Metrotile ridge correctly installed, foam vent strips seated, batten trays in place, and still persistent moisture on the sarking felt. The cause, on more than one project, was soffit blocked solid by insulation pushed tight against the wall plate during a separate loft upgrade. No inlet, no cross-ventilation, regardless of what the ridge vent was doing. The ridge cap handles the high-level outlet. The eaves detail, the soffit gap, the batten tray are all part of the same system, and specifying one without confirming the others is an incomplete solution.
Metrotile recommends 25mm continuous ventilation at both ridge and eaves as the baseline. On projects involving conversion of cold void to habitable space, a building services consultant should be involved before the ridge specification is finalised.
Metrotile Dry Ridge vs Traditional Ridge Systems